


Facebook ads are excellent for bringing new customers across a variety of fields. Using the conversion pixels on an external site, you can track the performance of the ads on any site where your goals take place. Combined with the reports from the Facebook advertising system, you can get good information about conversions via Facebook – but that’s not enough.
Unfortunately, the Facebook pixel does not provide accurate information about the conversions that occurred on our website, and we will want to get additional information on our campaign performance and compare it to the data we received on Facebook. In addition, some visitors reached our website from viral activity around our campaign (for example, one visitor shared our ad and their friend clicked on it), or via our page (and then if the visitor was not exposed to the ad via the campaign, the conversion still came from Facebook, creating discrepancies in our data). For this purpose, we can use Google Analytics. Aside from measuring website traffic and site statistics, Google Analytics can provide detailed information about the various campaigns you run online. In this article, I will explain how to connect Facebook to Google Analytics and track the campaigns we created using Google Analytics.
Step 1: Setting Goals in Google Analytics
To track our conversions, we will need to set up a “Goal” in Google Analytics that will represent, for Google Analytics, the destination we want users to reach. This goal will be the thank you page that users reach after arriving at the landing page or our website. This will also be the page where I place the Facebook conversion pixel.
1. Go to Google Analytics at: http://www.google.com/analytics
2. Upon logging into Google Analytics as a user, a list of all accounts will appear before you. Click on the Admin button in the top right corner:

Increasing Business Sales
3. Ensure the correct account is selected from the list on the left:
4. Click on Goals from the list on the right:

5. Click on the New Goal button:

6. Now select our goal, in this case – Contact Us, but this depends on your objective:

Organic SEO for Websites
7. Choose a name for the conversion, in this case – Thank You Page. Then decide how we want Analytics to count conversions; I selected the Destination – Thank You Page. But for advanced users, there are several more interesting options:

Analytics
8. Now we will need to set the thank you page as our goal; I recommend choosing the “Begins with” option. You can assign a value to each conversion and also check (by clicking Verify this Goal) whether there were conversions in the last 7 days. If there were conversions and you still get 0, you probably configured something incorrectly in the goals. Click Save Goal, and the goal will appear.

Organic SEO for Businesses
Google Analytics now knows that whenever a user visits this link, the goal has been achieved.
Step 2: Link Tagging
To manage a campaign and measure performance in Google Analytics, we will build the campaigns and ads as usual. However, we will tag the links by adding additional parameters to the links in the ads, thus passing information to Google Analytics.
What is link tagging? Link tagging is an action where we add tracking parameters known as UTM codes to the end of the link. Up to 5 tagging codes can be passed to Google Analytics, but there are three main UTM codes that we will work with for this type of campaign:
utm_source: The source from which the visitor arrived and where the ads are displayed. Here our value will be Facebook.
utm_medium: The ad name. The name is the name of the ad within the Ad Set. The names I give are the ad’s characteristics, such as link ad (postlink-A) or sidebar ad (rsh-B).
utm_campaign: I use the ad targeting, which for me equals the Ad Set name. For example, “fans_mobile” – meaning a campaign for page fans running on mobile.
These parameters are chained to the end of the URL like this:
?utm_source=facebook&utm_medium=postlink-A&utm_campaign=fans_mobile
Everything is added to the ad destination like this:
https://www.fialkovdigital.com/facebook/infographic-new-page-layout-facebook/?utm_source=facebook&utm_medium=postlink-A&utm_campaign=fans_mobile
There is a free tool called the URL Builder that can be used to create such links. I use a Chrome extension called Google Analytics URL Builder which, at the click of a button, allows us to tag the link to the website open in our browser.
Step 3: Adding Link Tagging to Facebook Ads
To add tagging to each campaign individually, you can add the tagging in Ads Manager or in Power Editor.
Ads Manager
If we are creating a new ad that leads to a website, when inserting the link, we will insert a tagged link:

If we selected an existing post, click on Show Advanced Options:

Then the option to tag the link will appear:

Power Editor:
If it is a link ad, simply enter a tagged link:

If it is a post, add the tagging under Optional URL Tags:

Step 4: Checking Performance in Google Analytics
1. To see the performance, click on Conversions > Goals > Overview in the left menu:

2. We will be able to see how many conversions we had by landing pages, and we can get information broken down by days

3. Click on Source / Medium to see where the conversions came from according to the tagging we configured:

4. Click on the link for the full report in the bottom right corner (View Full Report) – this will take us to the Acquisition > All Traffic report:

5. Notice how much information we can get with this report: the conversion rate in newsfeed ads stands at 19%, while sidebar ads bring only a 7.5% conversion rate. And that is still better than the conversion rate on Google.

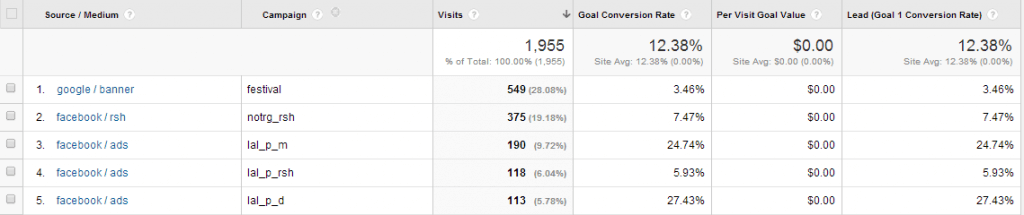
6. Define additional information by setting the Secondary Dimension to “Campaign”. This allows you to see the data according to the information you passed via the utm_campaign:

Here we can get a lot more interesting information: which targeting worked better, what the conversion rate of each campaign is, and how much we can pay to meet a specific cost per lead. We can see that the conversion rate of sidebar ads is much lower than that of newsfeed ads. The reason for this is that the message conveyed in the smaller ads is not clear enough to bring the right people to the landing page. Therefore, it is important to understand that the ad serves as a very important filter in bringing the right people to the landing page. Although sidebar ads bring far more visits to the landing page at a cheaper cost – the cost per lead is much higher.
Additionally, when we evaluate ads solely by click-through rate (CTR), we must understand that ads that attract more attention will not necessarily bring us the best performance. This is the main reason why it is dangerous to judge the success or failure of a campaign based on click-through rate (CTR), and why it is important to measure campaigns by results:
Summary
The process of connecting data between Facebook and Google Analytics is essential so that we can properly measure the effectiveness of each of our campaigns. Thanks to the Facebook conversion pixel and Google Analytics, it is possible to obtain more accurate information for our campaigns and get full information about the actions users took on our website as a result of advertising on Facebook.
I recommend using link tagging not just in Facebook advertising. In fact, you can use link tagging in all your other online activities as well. I use link tagging for every link that goes out from any advertising medium I use, like Outbrain, the mailing list, and even links from other sites (if they agree to change the link).
On my site, I use the plugin Google Analytics Dashboard for WP, which allows me to see real-time data from Google Analytics. But with link tagging, I can, for example, know that 7.1% of visits to the site come through my mailing list:

Such information about each of your advertising media will allow you to understand the varying effectiveness of each advertising channel and maximize your profits from each campaign.